Capture Pattern
To obtain the best results when capturing images, a capture pattern has been defined. The image should be clear with sufficient frontal lighting. The face should be straight, facing the camera, without objects or obstructions and with a neutral expression.
Normally, captured images present the following problems:
- Lighting behind the client - The front lighting needs to be good enough to capture the face clearly;
- Blurry lighting - The front lighting needs to be good enough to capture the face clearly;
- Face too close to capture + lighting** - The face needs to be framed in the center of the camera and the front lighting needs to be good enough;
- Blurry images** - The person's face needs to be in focus at the time of capture;
- Shaky images - Stabilize the camera at the time of capture;
- Client wearing glasses - The client needs to be without glasses or objects that could prevent a full view of the face.
How to get a good image capture
- Face positioning and additional information:
- The photo must be taken from the front - look straight into the camera and keep your head straight. The face must be centered. Shoulders should be aligned, parallel to the image plane of the camera.
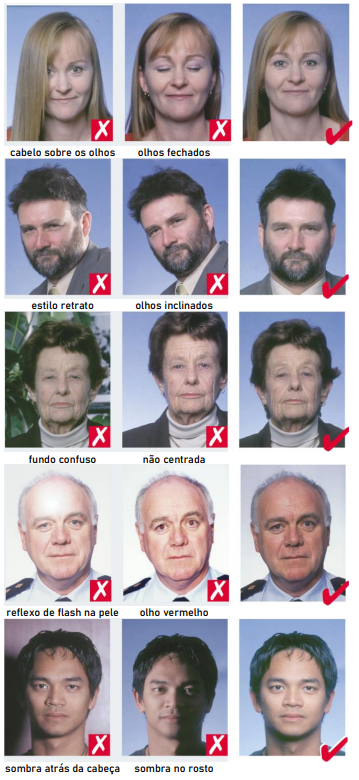
- The eyes must be open naturally - the pupils and iris must be visible, there may be exceptions due to ethnicity or specific individual reasons.
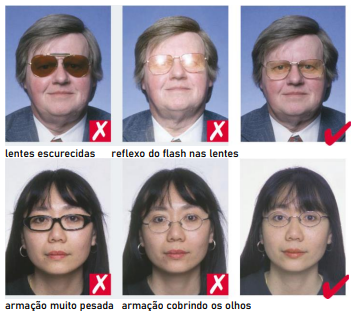
- Glasses - the photo must be captured without glasses. In the impossibility of not using the glasses, the drop by the biometrics engine is increased.
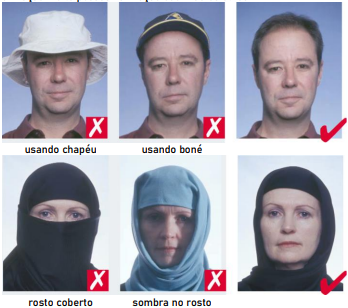
- No hat, cap, or mask - the face area must be clearly visible.
- Neutral Physiognomy - the face must have a neutral expression, the person should not smile, raise eyebrows, squint or frown.
- Hairstyling - The hair must not cover the area of visibility of the eyes.
- Lighting and background:
- Clear, smooth background with no texture. It should not contain spots, lines or curves that are visible in the captured image. Light colors such as light blue or white can be used as long as there is sufficient distinction between the face/hair area and the background. The camera's color settings should not be changed depending on the background color.
- Behind the image of the face, there should be no shadow. There should also be no visible objects in the background, such as people, furniture, patterned wallpaper, plants.
- The lighting needs to be adequate and even, distributed evenly across the face so that there is no difference between the left and right sides. The photo needs to be bright and have good contrast between hair, face and background.
- Poorly lit photos are photos when the lighting is only on the side, top or bottom.
- Images in .JWT format (generated using the Unico SDK)
- Captured images in color
Examples of standard and non-standard photos:
The photo must contain:
- Color
- Framework
- Sharp, clear focus, no ink marks or creases

- Look directly to the camera
- Show natural skin tone
- Have proper brightness and contrast

- Neutral physiognomy and clearly visible open eyes
- No hair over the eyes.
- Facing the camera, not looking over the shoulder or leaning over, and showing the both edges of the face clearly.
- With a simple light colored background, preferably white.
- With even lighting, no shadows or flash reflections on the face and no red-eye.
- No colored contact lenses.
- No earrings or piercings.
- No make up.

The use of glasses is not recommended, but in cases where the use of glasses is necessary:
- The eyes must be clear, with no reflection from the flash or the ambient light on the glasses and no colored lenses.
- The frame must not cover any part of the eyes.

Headgear items and veils are not permitted, except for religious reasons, provided that facial features from the bottom of the chin to the top of the forehead and both edges of the face must be clearly visible.

Note: Images taken from the "ICAO Guide for MRTD Photo Guidelines. ICAO. ICAO. Icao guide for mrtd photo guidelines. http://www.icao.int/Security/mrtd/Downloads/TechnicalReports/Annex_A-Photograph_Guidelines.pdf.
TIPS
Add user guidance before capturing the picture:

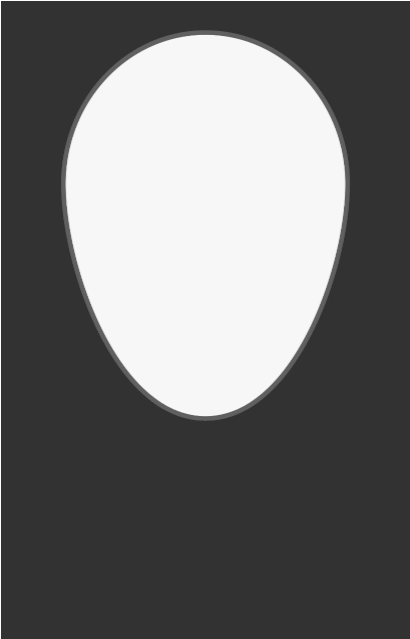
Use frames to guide the positioning of the face. Fitting the face into the frame increases the chance of getting a valid biometrical picture:

Any concerns?
Missing something or still need help? If you are already a customer or partner, you can contact us through the Help Center.